
Label Templates
Design, version, and approve Zebra ZPL label templates with dynamic variables, and print labels from batch and inventory records.
Label templates in Clarix are the approved, version-controlled ZPL (Zebra Programming Language) code definitions for every label type used in your facility. Each template defines the visual layout, text elements, barcodes, and dynamic variables that are populated at print time from the batch or inventory record being labeled. Managing templates through Clarix rather than loading ZPL files directly onto printers ensures that every label produced is traceable to an approved, validated design.
Navigate to Labels → Templates to view and manage label templates.
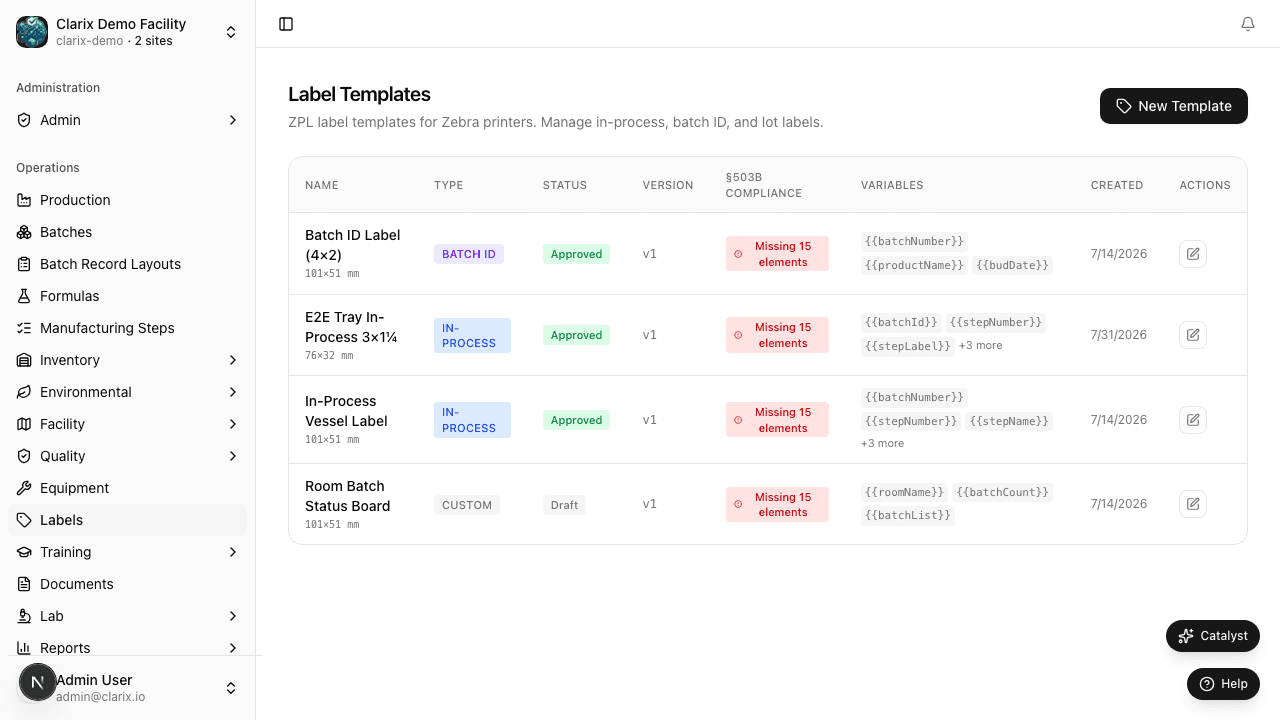
Viewing the templates list
The templates list shows all label templates across all label types. Each row displays:
- Template Name — a descriptive name for the template
- Label Type — the category (In-Process Vessel, Batch ID, Inventory Lot, Custom)
- Version — the current version number
- Status — Draft, Under Review, or Approved
- Last Updated — the date the template was last modified
Click any template to open its detail page, where you can view the ZPL code, the variable mapping, and the approval history.
Creating a new label template
- Click New Template from the templates list.
- Enter the Template Name — a clear, specific name such as "IV Bag Label — Batch ID Standard" or "Raw Material Lot Label — Barcoded."
- Select the Label Type: In-Process Vessel Label, Batch ID Label, Inventory Lot Label, or Custom.
- Select the Label Size — the physical dimensions of the label (e.g., 4" × 2", 4" × 6"). This must match the label stock loaded in your Zebra printer.
- Enter the ZPL Code in the code editor. ZPL is the native language of Zebra thermal label printers. If you are starting a new template, click Load Starter Template to insert a pre-formatted ZPL skeleton for the selected label type. The starter template includes common elements (facility name, barcode, date fields) and uses the standard Clarix variable syntax.
ZPL variables
Dynamic content in Clarix label templates is defined using double-brace variable syntax: {{variableName}}. At print time, the system replaces each variable with the actual value from the linked batch or inventory record. The following variables are available:
Batch label variables
| Variable | Description |
|---|---|
{{batchNumber}} | Batch number (e.g., BT-2026-0042) |
{{productName}} | Name of the compounded product |
{{lotNumber}} | Batch lot number |
{{budDate}} | Beyond-use date |
{{formulaCode}} | Formula code from the formula record |
{{quantity}} | Quantity compounded |
{{unit}} | Unit of measure (mL, vials, etc.) |
{{route}} | Route of administration |
{{compoundingDate}} | Date the batch was compounded |
{{operatorName}} | Name of the compounding technician |
{{facilityName}} | Facility name from organization settings |
Inventory lot label variables
| Variable | Description |
|---|---|
{{itemName}} | Inventory item name |
{{lotNumber}} | Lot or batch number of the received material |
{{manufacturer}} | Manufacturer name |
{{expirationDate}} | Manufacturer expiration date |
{{receivedDate}} | Date the lot was received |
{{quantity}} | Quantity on hand |
{{date}} | Current date at time of print |
General variables
| Variable | Description |
|---|---|
{{date}} | Today's date (auto-populated at print time) |
{{time}} | Current time at print (for in-process labels) |
{{operatorName}} | Currently logged-in user's name |
ZPL validation
Before you can save a template (even as a Draft), Clarix validates the ZPL code for syntax errors. Common ZPL syntax issues detected include: unclosed format commands, invalid field positions, unrecognized barcode types, and malformed variable references. The validator highlights errors with line numbers and error descriptions so you can correct them before saving. Variable references are also checked to ensure that only recognized variable names are used.
Submitting a template for approval
Once the ZPL code is complete and validated:
- Click Submit for Approval from the template detail page.
- The template moves to Under Review status.
- A Document Controller or Admin receives a notification to review the template.
- The reviewer inspects the ZPL code and, ideally, prints a test label on a physical Zebra printer to verify layout and content before approving.
- Once satisfied, the reviewer clicks Approve and enters their Facility PIN. The template moves to Approved status and becomes available for production printing.
Printing labels from a batch record
Once a template is Approved, it can be used to print labels directly from batch and inventory records:
From a batch record:
- Open the batch detail page.
- In the batch header or component rows, click the Print Label icon (printer icon).
- Select the Approved template from the dropdown. Only Approved templates of the appropriate type appear.
- Confirm the pre-populated label data (the system shows you a preview with the actual values that will be printed).
- Select the number of copies.
- Click Print. The job is sent to the configured Zebra printer. The print event is logged in the audit trail.
From inventory (lot labels):
- Navigate to Inventory → [Item] → Lots.
- Find the lot row and click Print Label in the row actions.
- Select the Approved inventory lot template, confirm the data, and print.
Template versioning
When an Approved template needs to be modified, click Create New Version on the template detail page. This creates a Draft copy with an incremented version number. Make your changes, validate the ZPL, and submit the new version for approval. When the new version is approved, the old version is archived and the new version becomes the active template for all future prints.
Role required: Label Designers and Admins can create and edit templates. Document Controllers and Admins can approve templates. All production staff can print labels using Approved templates.
Tray and custom label sizes
The label template designer supports a range of physical label stock sizes, including presets optimized for the tray labels commonly used in 503B compounding.
Built-in size presets
Click any preset button in the designer to instantly set the width and height fields:
| Preset | Dimensions | Common use |
|---|---|---|
| 4×2 in | 101 × 51 mm | Standard vial/bag label |
| 4×2.5 in | 101 × 64 mm | Large batch ID label |
| 3×1¼ in | 76 × 32 mm | IV tray label (short) |
| 3×1⅛ in | 76 × 29 mm | IV tray label (narrow) |
Free-form dimensions
Enter any value from 10 mm to 300 mm in the width and height fields to create a custom size label. The designer canvas updates in real time to show the correct aspect ratio.
How dimensions affect printing
When a template is saved with specific dimensions, Clarix embeds ^PW (print width) and ^LL (label length) ZPL commands at the top of every generated ZPL string. This instructs the Zebra printer to use the correct label stock size automatically — no manual printer configuration needed when switching between label types.
Note: The physical label stock loaded in the printer must match the template dimensions. If you print a 76×32 mm template on a 101×51 mm stock roll, the print will be positioned in the top-left corner of the larger label. Always verify the correct label stock is loaded before printing.
Preview reflects actual template dimensions
The label preview dialog opens with a canvas sized to match the template's width and height in millimeters. A 76×32 mm tray template will show a narrow landscape canvas; a 101×64 mm template will show the wider standard canvas. This allows you to visually verify layout at real scale before approving the template.
Role required: Label Designers and Admins can configure template dimensions. Changes require re-submission for approval — create a new version if dimensions change on an already-approved template.
Related pages
Labels Overview
Understand how Clarix manages Zebra ZPL label templates with version control and approval workflows to ensure every dispensed product carries an FDA-compliant label.
Printing Labels
Complete guide to printing labels in Clarix — in-process vessel labels from batch steps, lot labels from inventory, batch ID labels, and the Zebra ZPL workflow.