
Batch Import
Import batches into Clarix via CSV/XLSX file upload, barcode scan, AI document extraction, or automated webhooks.
Batch Import
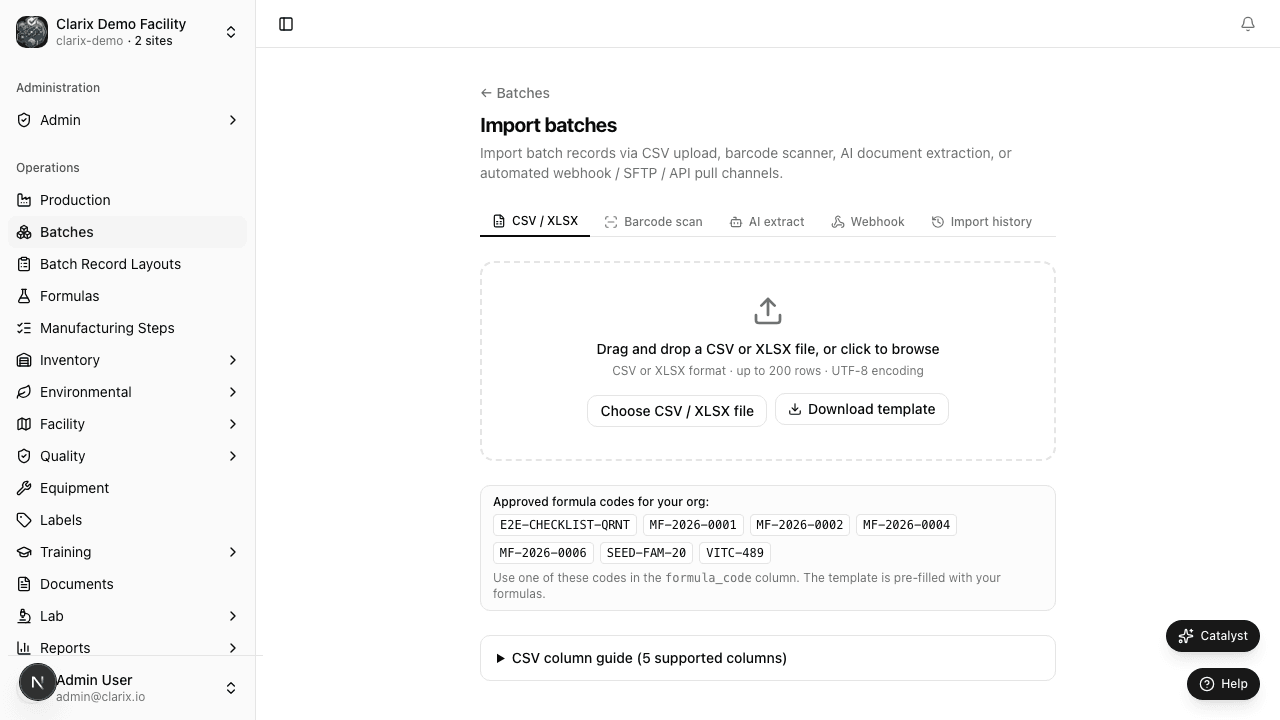
The Import Hub at /batches/import provides multiple methods to bring batch data into Clarix — whether you are migrating historical records, receiving data from a connected system, or digitizing paper batch records. All imported batches are reviewed before being finalized.
Accessing the Import Hub
- Navigate to Batches in the sidebar.
- Click Import in the page header, or navigate directly to
/batches/import.
The Import Hub is organized into tabs for each import method, plus an Import History table showing all past imports.
CSV / XLSX file upload
Use this method to bulk-import batches from a spreadsheet — for example, migrating historical batch data from a legacy system or loading a pre-prepared batch schedule.
Role required: Admin or QA Manager.
Preparing your file
Download the template CSV from the Import Hub to see the required column format. The same columns apply for XLSX files. The key columns are:
| Column | Required | Description |
|---|---|---|
formula_id | Yes | The Clarix formula ID or formula number (e.g., MF-2026-0003) |
batch_size | Yes | Numeric batch size |
batch_size_unit | Yes | Unit (mL, g, units) |
scheduled_date | Yes | ISO 8601 date (YYYY-MM-DD) |
assigned_technician_email | No | Email of the assigned compounding technician |
status | No | Initial status (defaults to Draft) |
notes | No | Internal reference or notes |
Importing the file
- Click the File Upload tab in the Import Hub.
- Click Choose CSV / XLSX file and select your file (
.csvor.xlsx). - Clarix validates the file immediately — errors are shown per row (e.g., invalid formula ID, missing required field). XLSX files are parsed client-side using the first sheet.
- Review the validation results. Rows with errors are highlighted in red with an explanation.
- Valid rows are shown in green and ready to import.
- Click Import valid rows to create the batches. Invalid rows are skipped.
- You receive a summary: N batches created, M rows skipped with errors.
File limits: CSV and XLSX files must not exceed 200 rows per import. XLSX files up to 25 MB are accepted; CSV files up to 10 MB.
Barcode scan import
Use this method to digitize a physical batch record by scanning the barcode on the paper document.
Role required: Compounding Technician or above.
This is designed for facilities that use pre-printed paper batch records with a barcode header. Scanning the barcode creates a matching digital batch record in Clarix.
- Click the Barcode Scan tab in the Import Hub.
- Click Start scanning.
- Using your device camera or USB barcode scanner, scan the barcode on the paper batch record.
- Clarix parses the barcode content (batch number, formula reference, lot) and displays the extracted data for review.
- Confirm the extracted data is correct.
- Click Create batch to import.
The batch is created in Draft or In Progress status depending on the data encoded in the barcode.
AI document extract
Use this method to digitize a scanned PDF of a paper batch record using Clarix AI extraction.
Role required: QA Officer, QA Manager, or Admin.
This is the most powerful import method for migrating legacy paper records. Clarix AI reads the scanned PDF and extracts structured batch data, which you then review before confirming.
How it works
- Click the AI Extract tab in the Import Hub.
- Click Upload document and select a scanned PDF of your batch record.
- Clarix sends the document to the AI extraction service. Processing typically takes 15–60 seconds depending on document length.
- A structured preview of the extracted data is displayed:
- Batch number, formula reference, batch size, date
- Component lots and quantities
- Step completion records
- Signatures and dates (recognized from handwriting or printed text)
- Review each extracted field. Fields where the AI had low confidence are highlighted — verify these manually.
- Edit any incorrect values directly in the preview form.
- Click Confirm and import to create the batch record with the extracted data.
File size limit: Uploaded documents must not exceed 20 MB. Documents larger than 20 MB should be split into sections or reduced in resolution before uploading.
Quality note: AI extraction works best on clearly printed forms with good scan quality (300 DPI or higher). Handwritten forms may have lower accuracy. Always review the preview before confirming.
Webhook import
Use this method to receive batch data automatically from a connected external system — such as a pharmacy management system, ERP, or automated production system.
Role required: Admin to configure. System-to-system integration.
How webhooks work
You configure your external system to POST batch data to a Clarix webhook endpoint. Clarix authenticates the request using an HMAC secret and processes the payload automatically.
Setting up a webhook
- Click the Webhook tab in the Import Hub.
- Click Generate secret to create a new HMAC signing secret.
- Copy the secret (it is shown only once — store it securely).
- Click Copy endpoint URL to get the Clarix webhook endpoint URL.
- Configure your external system to:
- POST to the endpoint URL
- Sign requests with the HMAC secret using
HMAC-SHA256on the request body - Include the signature in the
X-Clarix-Signatureheader
Webhook payload format
Your external system should send a JSON payload in this structure:
{
  "batchNumber": "BN-EXT-2026-001",
  "formulaId": "MF-2026-0003",
  "batchSize": 2500,
  "batchSizeUnit": "mL",
  "scheduledDate": "2026-06-15",
  "technicianEmail": "technician@facility.com",
  "components": [
    {
      "materialName": "Famotidine USP",
      "lotNumber": "LOT-2026-0001",
      "quantityIssued": 51440,
      "unit": "mg"
    }
  ]
}
Clarix responds with 200 OK and the created batch ID on success, or a 4xx error with details on failure.
Rotating the secret
To rotate your HMAC secret (e.g., as part of a security review):
- Click Rotate secret in the Webhook tab.
- A new secret is generated.
- You have a 24-hour window where both the old and new secrets are accepted, giving you time to update your external system.
- After 24 hours, the old secret is invalidated.
Import history
The Import History table at the bottom of the Import Hub shows a log of all past imports with:
- Import method (CSV, XLSX, Barcode, AI Extract, Webhook)
- Timestamp
- Imported by (user)
- Number of batches created
- Number of failures
- Status (Success / Partial / Failed)
Each import is tagged with its source (e.g., barcode, ai, csv, webhook). This source label appears in the import history and in the audit trail, making it easy to identify how a batch record entered the system during an inspection.
Click any import log row to see the detailed results, including which rows succeeded and which failed with error messages.
Related pages
- Creating a Batch — Creating a single batch manually
- Bulk Actions — Performing actions on multiple batches at once
- Batch Overview — How imported batches fit into the batch lifecycle