
Executing Steps
Learn how to start batch execution, work through production steps in order, and handle exceptions like out-of-sequence steps and amendments.
Executing Steps
Step execution is the core of the Clarix batch workflow. When you execute a batch, you work through each production step in sequence — entering measurements, scanning barcodes, completing checklists, and recording signatures — and Clarix builds the electronic batch record automatically.
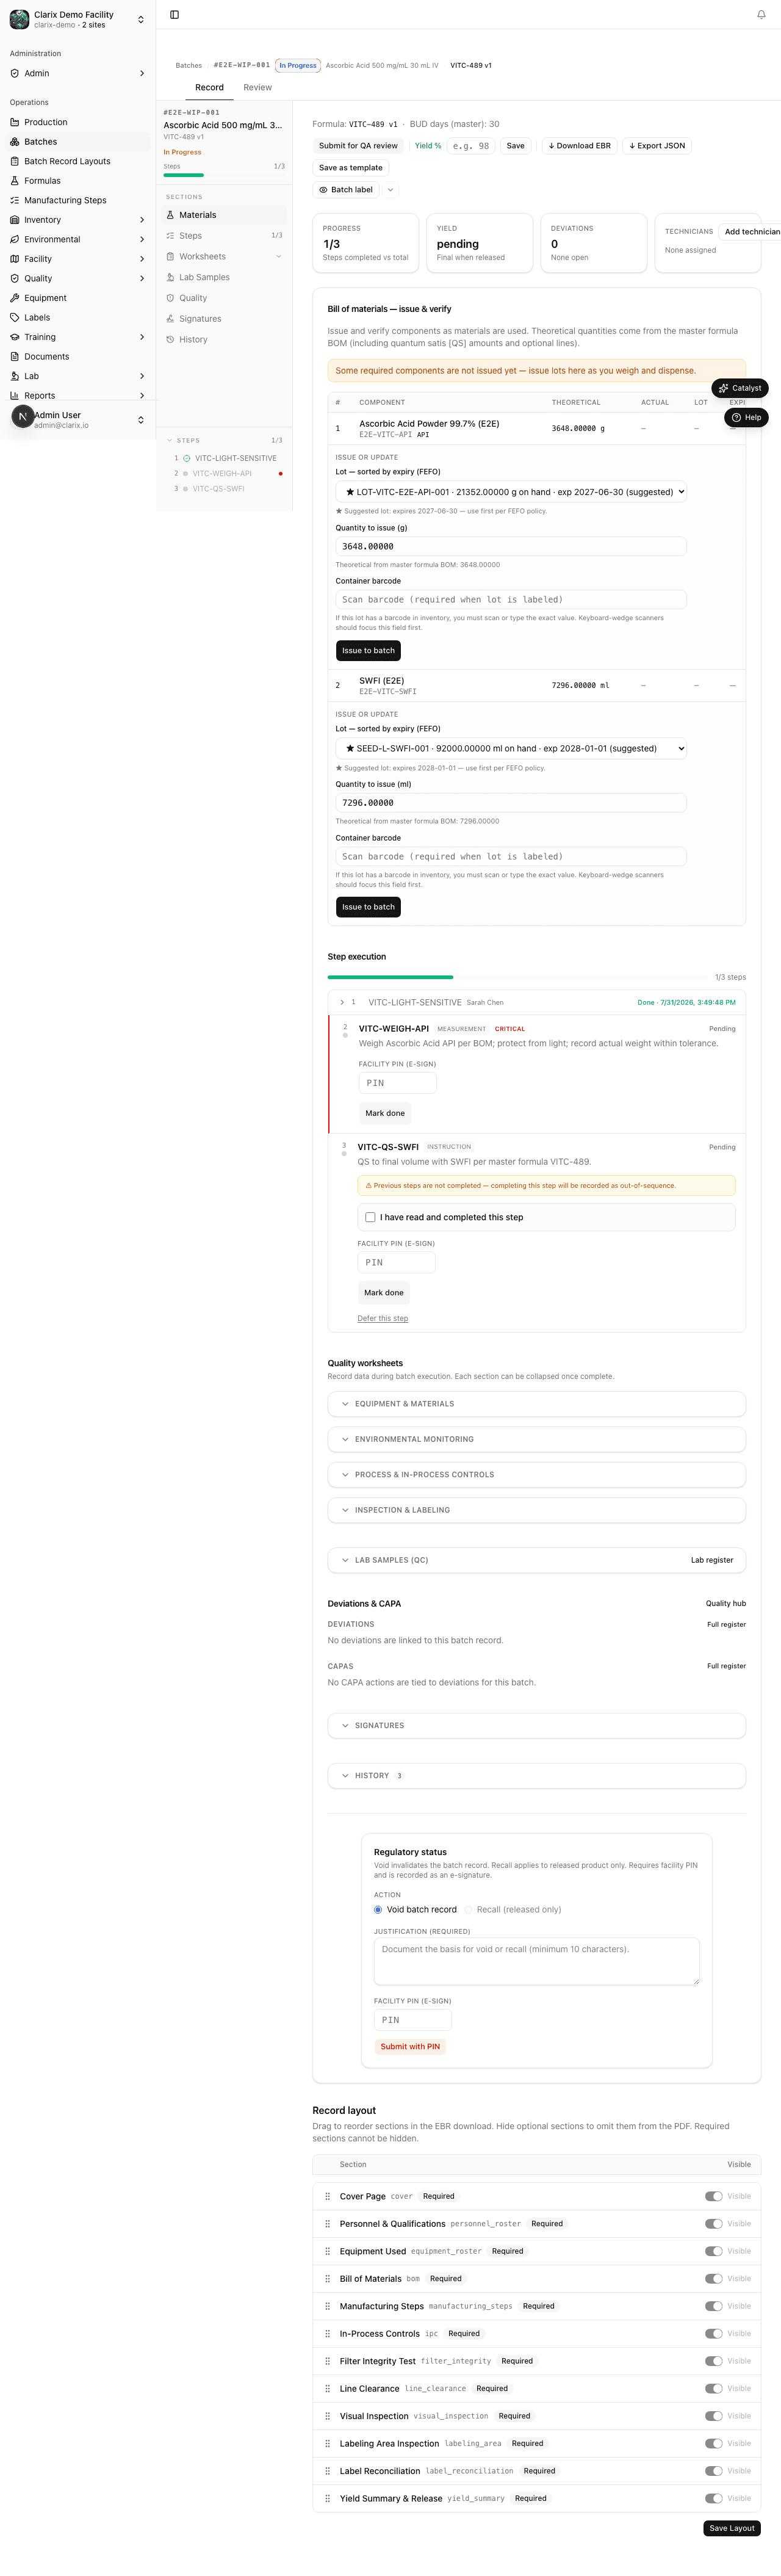
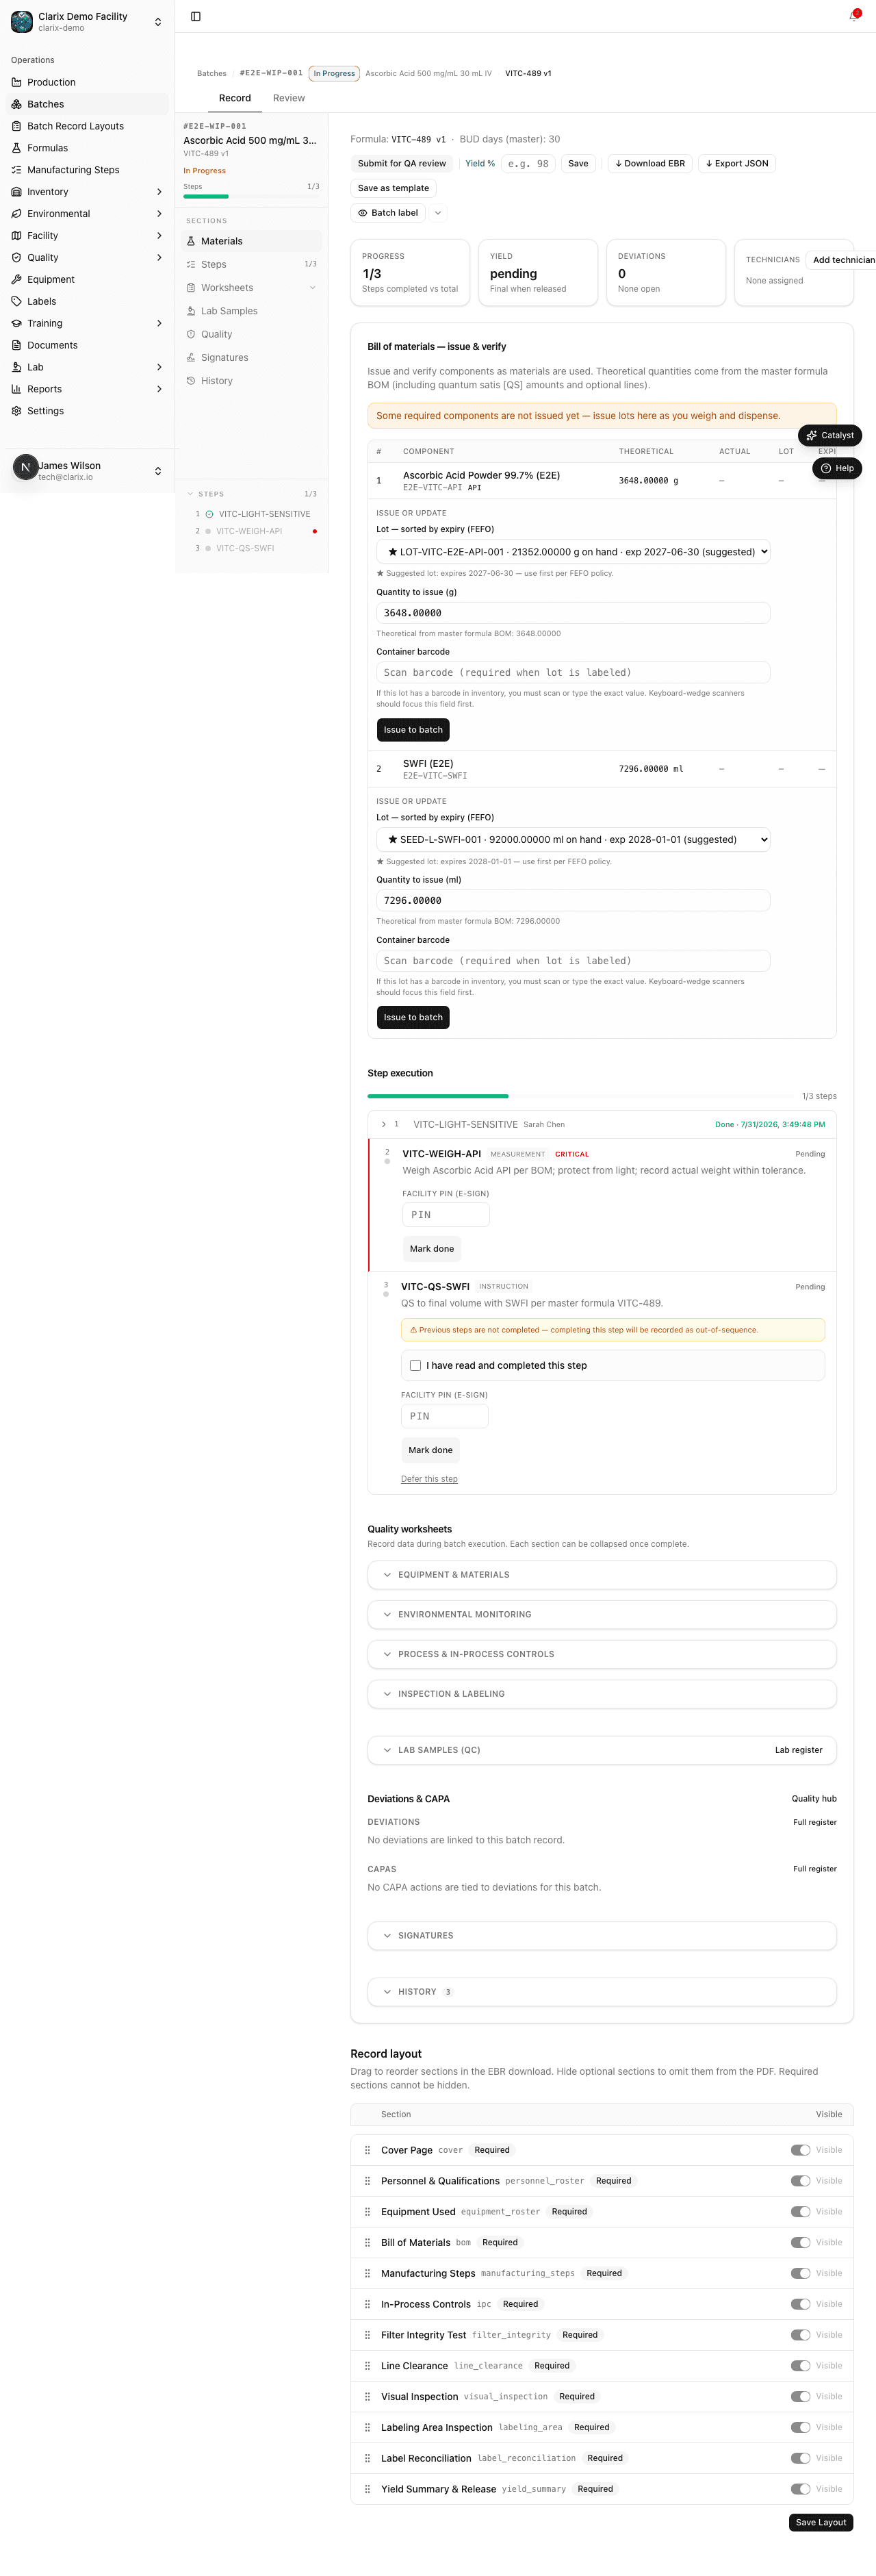
Compounding technicians see a focused execution view with step completion controls and no release actions:
Starting execution
Role required: Compounding Technician, QA Officer, QA Manager, or PIC.
Before execution can begin, you need a facility PIN. This PIN is set by your Admin and is shared by authorized personnel who can start batches at your facility. It acts as a physical-presence verification — ensuring someone is actually on the shop floor before production begins.
- Open the batch detail page (click the batch number from the catalog).
- Click the Start execution button at the top of the page.
- A dialog prompts you to enter the facility PIN.
- Enter the PIN and click Confirm.
- The batch status changes to In Progress and the step table becomes active.
The start time is recorded in the batch record with the user identity and PIN verification timestamp.
Training qualification gate
Before execution starts, Clarix verifies that the acting user has no expired training or qualification records. If your account has an expired training record for a plan that is marked as required for batch compounding, execution is blocked with a clear error message:
"Your training or qualification records are expired. Please complete re-qualification before executing batch steps."
Contact your Training Manager to complete the required retraining and have your record updated before attempting to start or work through a batch. This gate satisfies 21 CFR Part 211.68 and USP <797> requirements for demonstrated competency of compounding personnel.
The step execution table
Once execution starts, the Steps tab shows all batch steps in the order they were defined in the Master Formula. Each step displays:
- Step number — sequential order
- Step name — as authored in the formula
- Type — Measurement, Barcode Scan, Checklist, etc.
- Status icon — the current completion state
Step status icons
| Icon | Status | Meaning |
|---|---|---|
| ○ | Pending | Not yet started |
| ▶ | In Progress | Currently being worked on |
| ✓ | Complete | Completed successfully |
| ✗ | Failed | Measurement out of tolerance or scan validation failed |
| ⟳ | Deferred | Skipped temporarily with supervisor approval |
| ! | Amended | A correction was submitted and approved |
Completing a step
- Click on the step row to expand it and see the full instructions.
- Provide the required input (measurement value, scanned barcode, checklist items, etc.) — see Step Types for details on each input type.
- Click Complete step (or the equivalent action button for that step type).
- The step is marked complete with a timestamp and your user identity is recorded.
- The next step becomes available.
Equipment calibration gate
If a step captures a specific piece of equipment (e.g., a balance, a pump, or a measuring device), Clarix checks the latest calibration record for that instrument before allowing step completion. If the calibration due date has passed without a new calibration being logged, the step is blocked:
"Equipment calibration is overdue (due YYYY-MM-DD). Recalibration is required before use."
To unblock, navigate to Equipment → Assets, find the instrument, and log the calibration event (see Calibration). Once the calibration is logged with a future due date, the step can be completed normally. This gate satisfies 21 CFR Part 211.68 requirements for calibrated and maintained instruments in the production process.
A yellow calibration warning also appears on the batch detail page next to any step whose linked equipment has a calibration due date within the next 14 days.
Required steps and step order
By default, steps must be completed in sequence. You cannot skip to step 10 while step 5 is still pending. If you attempt to interact with a future step, it will be locked until all prior required steps are complete.
This enforces the procedure as written by your pharmacist and ensures the batch record is a true reflection of what happened in production order.
Out-of-sequence step override
In rare cases, a supervisor may authorize completing a step out of sequence — for example, if a measurement step needs to be done earlier due to equipment constraints.
Role required: Only a PIC or Admin can authorize an out-of-sequence step override.
- Click the locked step you need to complete early.
- Click Override step order.
- A dialog prompts for an Admin or PIC PIN and a written reason for the override.
- After entering the PIN and reason, the step unlocks.
- The override reason and authorizing user are permanently recorded in the batch record.
Deferring a step
A step can be deferred — temporarily skipped — if it cannot be completed now but must be completed later before the batch can be submitted.
Role required: PIC or Admin PIN required to defer a step.
- Click the step you need to defer.
- Click Defer step.
- Enter the reason for deferral (e.g., "Equipment not available, will complete after calibration").
- The step status changes to Deferred and execution continues with the next step.
- Deferred steps must be completed before the batch can be marked Complete and submitted for QA.
Requesting a step correction (Amendment)
If a step was completed with an incorrect value — for example, a weight was entered wrong — a correction must be submitted as a formal amendment rather than simply editing the value. This preserves the audit trail.
Role required: The technician submits the request; a PIC or QA Officer must approve the amendment.
- Click on the completed step that needs correction.
- Click Request amendment.
- Enter the original value, the corrected value, and the reason for the correction.
- Click Submit amendment request.
- A QA Officer or PIC receives the request. They review it and either approve (updating the batch record with the corrected value and a notation) or reject it.
- Both the original value and the corrected value, along with all signatures, are permanently retained in the batch record.
Completing the batch
After all required steps are complete:
- Enter the actual yield as a percentage (e.g., 98.2%). Yield is calculated from the actual units produced vs. the theoretical yield from the formula.
- Click Mark as complete.
- The batch status changes to Completed and it is ready to be submitted for QA review.
Note: Yield below your organization's threshold (configurable in Settings → Business Rules, default 85%) triggers a warning and automatically flags the batch for exception review.
Checklist steps and incomplete item warnings
When a batch step is a Checklist type, each item must be checked off individually before the step can be completed. Checklist items are either required (marked with an asterisk * in the formula) or optional.
Required items
If any required checklist item is unchecked, the Mark done button remains disabled and an inline alert appears:
"Complete all required checklist items before marking this step done."
The technician must check every required item before proceeding. This validation is enforced both in the UI and on the server — the step cannot be completed via any path if required items are unchecked.
Optional items
If all required items are checked but one or more optional items remain unchecked, clicking Mark done opens a confirmation dialog:
"Some checklist items are unchecked. Do you want to continue anyway?"
The technician can:
- Click Cancel to return and check the remaining items, or
- Click Continue to complete the step with the unchecked optional items recorded as incomplete.
The completed step record permanently notes which items were checked and which were skipped.
Note: Whether an item is required or optional is configured by the pharmacist in the Master Formula step definition. If an item should always be mandatory, mark it as required in the formula.
Quarantined lot barcode scan alerts
When a technician scans a lot barcode during a Barcode Scan step and the scanned lot has a Quarantined status in inventory, Clarix displays a prominent alert:
"⚠ This lot is currently quarantined and has not been released for production use by QA."
Below the alert, a required acknowledgment checkbox appears:
☐ I acknowledge this lot is quarantined. I have confirmed with QA that use in this batch is authorized.
The Mark done button is disabled until the acknowledgment checkbox is checked. This ensures no quarantined lot can enter the batch record without a documented, deliberate human decision.
What gets recorded
When a step is completed with a quarantined lot acknowledgment, the following is stored in the batch step's supplemental data (visible in the MBR and audit trail):
- The scanned lot number and its quarantine status at time of scan
- Timestamp of the acknowledgment
- User who acknowledged
Important: Acknowledging a quarantined lot during a step is an exception event. Facilities should review these events in the audit trail and open a deviation if the use of a quarantined material was not pre-authorized by QA. See Lot Management for the standard QA release workflow.
Normal lots
For lots in Released or In Use status, the barcode scan proceeds normally with no acknowledgment required — a green confirmation appears and the step can be completed immediately.
Related pages
- Step Types — Detailed reference for all 12 step types
- Components and Lots — Issuing inventory to a batch during execution
- Worksheets — In-process controls and inspection records
- QA and PIC Release — What happens after steps are complete
- Lot Management — Lot statuses, QA release, and quarantine workflow
- Receiving to Production — End-to-end material flow from receipt through batch use