
Business Rules
Configure automated alerts, blocks, and CAPA triggers based on system events — including yield thresholds, calibration due dates, EM excursions, and lot expiration warnings in Clarix.
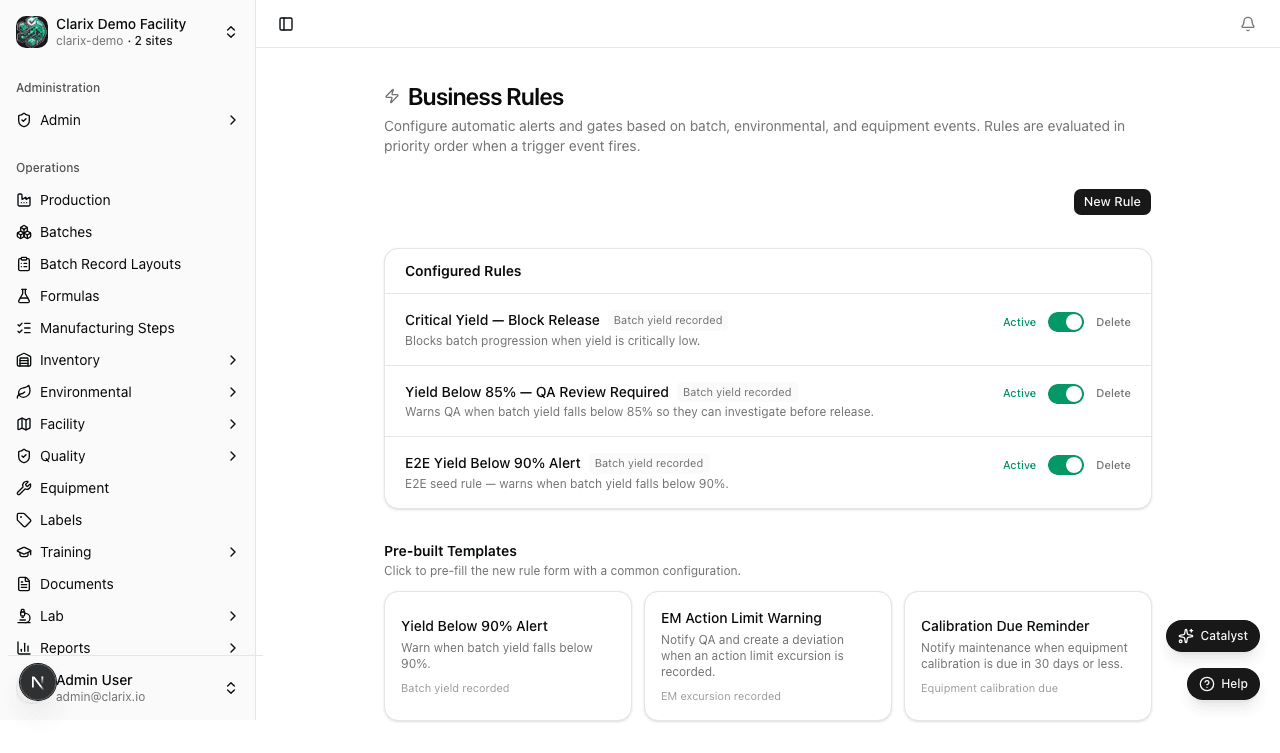
The Business Rules settings page at /settings/rules is where administrators configure the automated intelligence layer of Clarix. Business rules monitor system events in real time and respond with configured actions — notifying the right people, blocking unsafe actions, or automatically creating quality records. Rules replace manual monitoring workflows and ensure your facility never misses a critical event simply because no one was watching at the right moment.
Role required: Administrator only. Individual rule toggling (on/off) may be delegated to QA Managers in some configurations. All rule changes are logged in the audit trail.
What business rules can do
Each business rule has three components:
Trigger event — The system event that causes the rule to evaluate. Examples: a batch step is completed and yield is calculated; a calibration due date passes; an EM sample result is entered; an inventory lot's expiration date is within a threshold.
Condition — The logical condition that must be true for the rule to fire. Examples: yield % is below 85%; the equipment asset is in "In Service" status; the EM sample is from a room classified as ISO 5; the lot is currently in "Released" status.
Action — What Clarix does when the trigger fires and the condition is met. Available actions:
- Notify — Send an in-app notification and/or email to specified roles (QA, PIC, Maintenance, etc.)
- Block — Prevent the associated action from proceeding (e.g., block batch release) until the block condition is resolved
- Auto-create — Automatically open a new deviation or CAPA record linked to the triggering event
Built-in rule templates
Clarix ships with a set of pre-configured rule templates based on common 503B compliance requirements. Built-in rules are visible in the rules list and can be toggled active or inactive, but their core logic (trigger and condition) cannot be modified. You can only control whether they are active and, for notify rules, which roles receive the notification.
Yield warning: below 85%
Trigger: Batch yield calculation completes. Condition: Actual yield % is below 85%. Action: Notify QA Officer and PIC with the batch number and the actual yield %.
This rule fires before the batch is released and allows QA to review the batch proactively. It does not block release — it only sends a notification. Use this as an early warning before the yield falls further.
Yield block and auto-deviation: below 75%
Trigger: Batch yield calculation completes. Condition: Actual yield % is below 75%. Action: Block batch release AND auto-create a Major deviation linked to the batch.
This rule prevents a batch from being released when yield is critically low. The auto-created deviation must be resolved before the block can be lifted. The PIC receives a notification of the block.
Calibration due warning: within 14 days
Trigger: Daily check of equipment asset calibration due dates. Condition: An in-service asset's calibration is due within 14 days. Action: Notify Maintenance Manager and Equipment Manager.
This rule fires once per asset when the 14-day window is reached and again 7 days before due. It provides lead time for scheduling calibration without emergency disruption.
EM excursion auto-deviation
Trigger: An EM sample result is entered and confirmed as an action limit excursion. Condition: The sample result exceeds the action limit for its room classification. Action: Auto-create a Major deviation linked to the EM sample and the affected room.
This rule ensures every action limit excursion generates a formal quality record without relying on manual deviation creation by the EM technician.
Lot expiring within 30 days
Trigger: Daily check of inventory lot expiration dates. Condition: A released lot's expiration date is within 30 days. Action: Notify Inventory Manager and Pharmacist.
This rule fires once per lot when the 30-day window is reached. It provides lead time to place replacement orders and prevent a situation where a critical material expires before a replacement lot arrives.
Creating a custom rule
In addition to built-in templates, you can create custom rules tailored to your facility's specific workflows:
- Navigate to Settings → Business Rules.
- Click New Business Rule.
- Give the rule a name (displayed in the rules list and in notifications).
- Select the trigger event from the dropdown.
- Configure the condition fields that appear based on the trigger (e.g., threshold value, status, classification).
- Select one or more actions and configure their parameters (e.g., which roles to notify, severity for auto-created deviations).
- Set the rule to Active (or save it as Inactive to configure before enabling).
- Click Create Rule.
The new rule is immediately evaluated on the next occurrence of its trigger event.
Toggling rules active and inactive
Every rule in the list has a toggle switch. Switching a rule to Inactive suspends it — the trigger will still fire, but no action will be taken. This is useful when:
- A rule is generating excessive notifications during a known exceptional period
- You are testing the trigger logic before enabling the full rule
- A specific action (e.g., block on yield) needs to be temporarily suspended for a validated reprocess
Note: Toggling a blocking rule to Inactive removes the block condition immediately. If there are batches currently blocked by that rule, they will become releasable as soon as the rule is deactivated. Use this capability with caution and ensure the QA team is aware.
Deleting rules
To permanently delete a custom rule, click the Delete button (trash icon) on the rule's row. Built-in template rules cannot be deleted — they can only be toggled inactive. Deletion of custom rules is logged in the audit trail.
Rule evaluation logging
Every time a business rule evaluates and fires an action, a log entry is created in the audit trail. The entry includes the rule name, the triggering event, the record that triggered it, the condition values, and the action taken. This provides a full history of every automated action Clarix has taken on your behalf.
Related pages
E-Signature Settings
Configure which authentication methods are required at each batch lifecycle gate — Start, QA Review, and PIC Release — to meet 21 CFR Part 11 electronic signature requirements.
Inventory Policy
Configure lot duplicate handling, CoA assay range, PO number requirements, and default receipt status for incoming inventory in Clarix 503B compounding facilities.