
Integrations
Configure SFTP polling, API pull, webhook import, and MasterControl sync for automated batch data import into Clarix from external pharmacy systems.
The Integrations settings page at /settings/integrations allows administrators to connect Clarix to external data sources and systems. Rather than requiring manual data entry for every batch or importing CSV files one at a time, integrations can automatically pull or receive batch data from your existing dispensing system, pharmacy information system (PIS), or document management platform. This page is the central hub for configuring all automated data flows into Clarix.
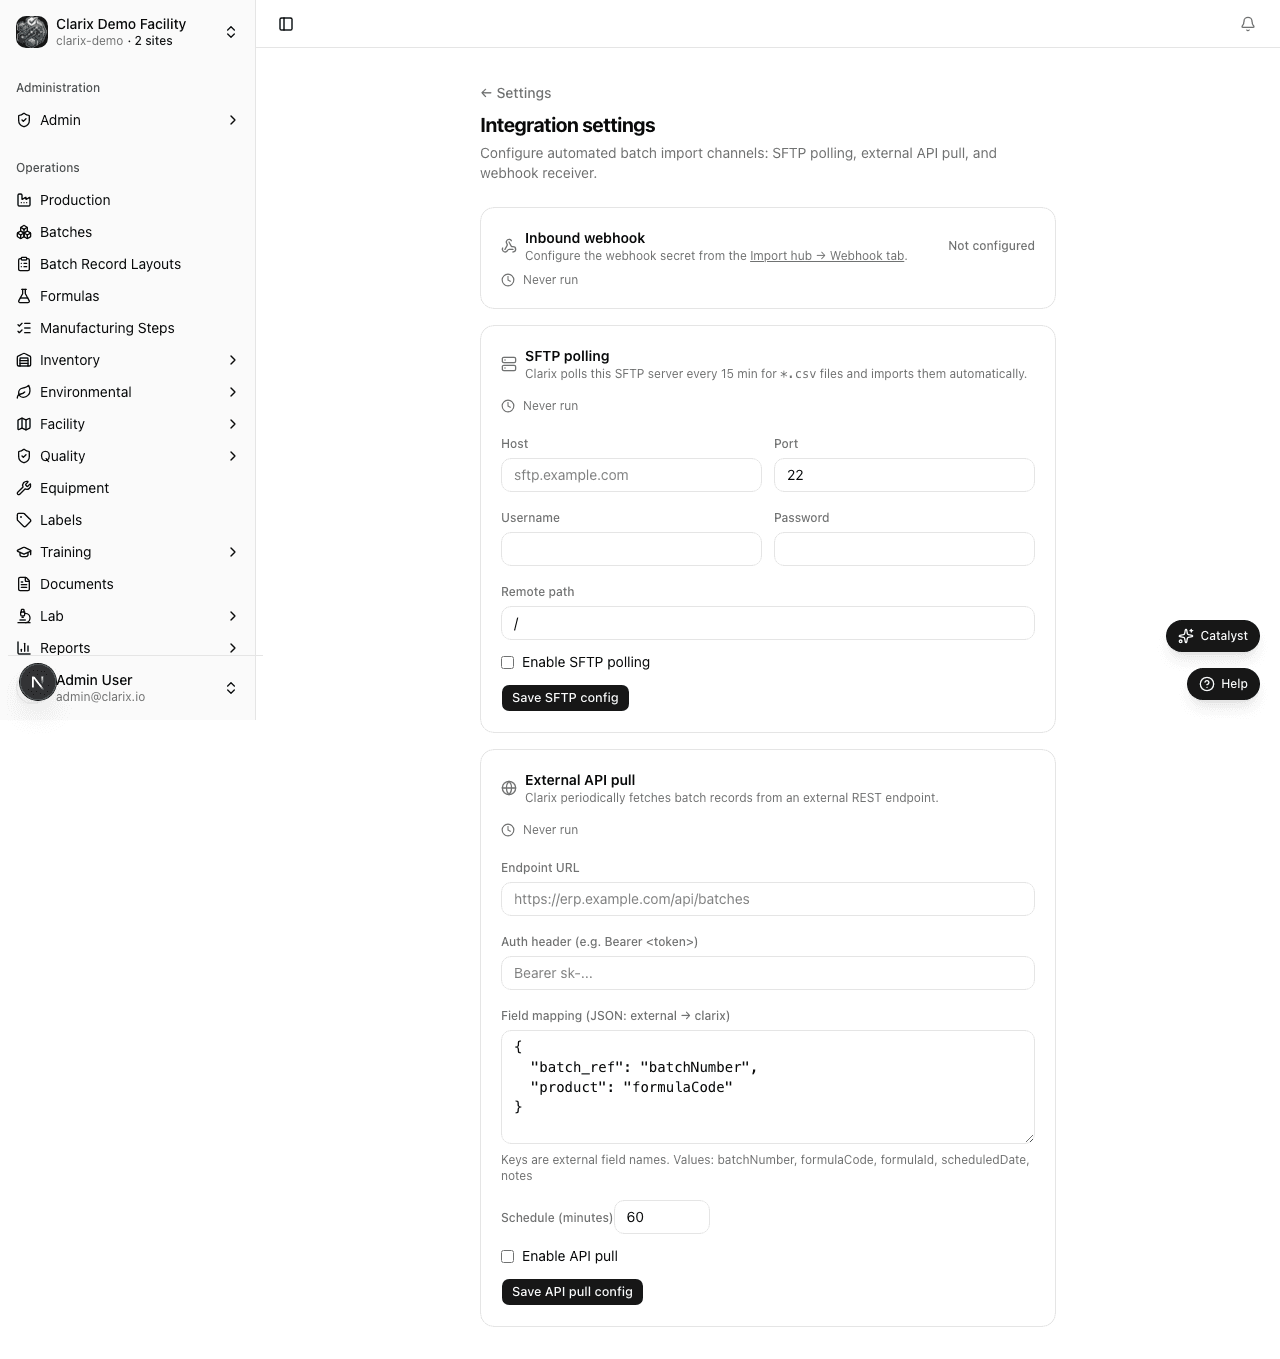
Role required: Administrator only. Integration credentials are sensitive — treat SFTP passwords, API keys, and webhook secrets with the same care as account passwords. All integration configuration changes are logged in the audit trail.
SFTP polling
SFTP (Secure File Transfer Protocol) polling connects Clarix to an SFTP server where your pharmacy or compounding management system drops batch data files. Clarix polls the SFTP server on a configured schedule, downloads new files, processes them, and imports the data automatically.
Configuring SFTP polling
- Navigate to Settings → Integrations.
- In the SFTP Polling section, click Configure.
- Enter the connection details:
- Host — The SFTP server hostname or IP address (e.g.,
sftp.yourpharmacy.com) - Port — The SFTP port (default: 22)
- Path — The directory on the SFTP server where import files are placed (e.g.,
/exports/clarix/) - Username — The SFTP login username
- Password or SSH Private Key — Authentication credentials for the SFTP connection
- Host — The SFTP server hostname or IP address (e.g.,
- Set the polling interval — how often Clarix checks for new files (minimum: 15 minutes; recommended: 60 minutes for most facilities). The interval is stored as
scheduleMinutesand is honored precisely: Clarix's automated cron job will not re-poll an integration that ran within its configured window, even if the cron itself runs on a fixed daily schedule. - Click Test Connection to verify that Clarix can connect to the SFTP server with the provided credentials.
- If the test succeeds, click Save SFTP Settings.
- Toggle SFTP polling to Active to begin automated polling.
Note: Files that have been successfully processed are moved to an
/archivesubdirectory on the SFTP server by default. Files that fail to process (due to format errors) are moved to an/errorssubdirectory with a corresponding error log file. Review the errors directory if imports are not appearing as expected.
API pull
API pull allows Clarix to call an external REST API endpoint on a schedule to retrieve batch data. This is appropriate when your source system exposes an API for data export rather than dropping files on an SFTP server.
Configuring API pull
- In the API Pull section, click Configure.
- Enter the API details:
- URL — The full endpoint URL to call (e.g.,
https://api.yoursystem.com/v1/batches/export) - API key — The authentication token or API key to include in the request header
- Pull schedule — How often Clarix calls the endpoint (options: every 15 minutes, every hour, every 6 hours, daily at a specific time). This schedule is stored as
scheduleMinutesand is honored precisely; the automated job skips any integration that was already run within its configured window.
- URL — The full endpoint URL to call (e.g.,
- Configure the field mapping — tell Clarix which fields in the API response correspond to which Clarix fields (batch number, formula, quantity, etc.)
- Click Test Pull to trigger a one-time API call and preview the data that will be imported.
- If the test succeeds and the preview looks correct, click Save API Pull Settings.
- Toggle API pull to Active.
Trigger pull now
The Trigger Pull Now button in the API Pull section forces an immediate pull outside the scheduled interval. Use this when you need to import a batch urgently or when troubleshooting the integration configuration. The result of an on-demand pull is logged in the integration history.
Webhook import
Webhook import allows an external system to push batch data to Clarix by making an HTTP POST request to a Clarix-provided endpoint. This is the lowest-latency integration option — data appears in Clarix immediately when the external system sends it, without waiting for a polling interval.
Setting up webhook import
- In the Webhook Import section, click Configure.
- Clarix displays your organization's unique Webhook Endpoint URL (e.g.,
https://clarix.fills.ai/api/import/webhook/your-org-id). Copy this URL and provide it to the external system administrator. - Click Generate Secret to create an HMAC signing secret. Copy the secret immediately — it is displayed only once.
- Provide the HMAC secret to the external system. The external system must include an HMAC-SHA256 signature of each payload in the
X-Clarix-Signaturerequest header. Clarix rejects any request with an invalid or missing signature. - Click Save Webhook Settings.
Note: The HMAC secret is used to verify that webhook payloads originate from your trusted external system and have not been tampered with in transit. If you suspect the secret has been compromised, click Regenerate Secret to issue a new one and provide the updated secret to the external system. The old secret is invalidated immediately.
For full documentation of the expected webhook payload format, field names, and example payloads, see Batch Import — Webhook Payload Format.
MasterControl integration
If your facility uses MasterControl for document and training management, Clarix can sync training records and quality events between the two systems. See MasterControl Integration for full configuration steps.
Configuring MasterControl sync
- Navigate to Settings → Integrations and click the MasterControl card, or navigate directly to
/settings/mastercontrol. - Follow the steps in MasterControl Integration.
Integration history
Each integration type maintains a history of its last 90 days of activity — every poll, pull, push, or sync event with a timestamp, record count, and success/error status. Review the integration history if you suspect an import is not working correctly.